Today I am going to discuss how to set up the Eclipse IDE with the Android SDK for Android development on Debian squeeze.
To begin make sure you have the Java Development Kit installed. I usually use sun’s Java but apparently openjdk works just as well although its not officially supported for android development. There are a few steps to go through but the commands below will make it quick.
Step 1: Install Java
To install suns Java make sure you have edited your sources list to include the non-free repository . In order to do this open a terminal login as root . I will use “as root” to denote where root is required. To login as root use
su
then enter your root password.
To return to normal user mode type exit
To begin
nano /etc/apt/sources.list as root
add non-free beside main in your main source line
deb http://http.us.debian.org/debian stable main contrib non-free
save the file and do an apt-get update as root
now do apt-get install sun-java6-jdk as root
choose yes to install and accept the agreement
Java should now be installed you can test by running javac in a terminal.
Step 2: Install Eclipse
Next , we must download eclipse from http://www.eclipse.org/downloads/
I use the classic version but any will do . For this tutorial I will be using the helios build for 64 bit architectures but its the same instructions for 32 bit ones.
download the build for you architecture and extract it when done using.
tar -xf eclipse-SDK-6.2-linux-gtk-x86_64.tar.gz
then move it to the /opt directory with the following command
mv ~/eclipse /opt as root
Step 3: Download the Android SDK
Next download the Android SDK from http://developer.android.com/sdk/index.html
once downloaded extract in the same way as we did with eclipse
tar -xf android-sdk_r11-linux_x86.tgz
then move it to the /opt directory like so
mv android-sdk-linux_x86/ /opt as root
you should now have both the Android SDK and Eclipse in the opt directory now
the next step is to add the android developer toolkit to eclipse
Step 4: ADT Plugin
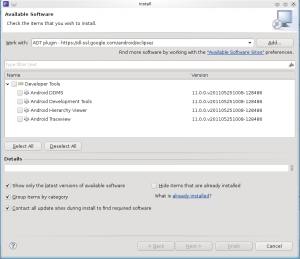
Start Eclipse, ( /opt/eclipse/eclipse) then select Help > Install New Software….
Click Add, in the top-right corner.
In the Add Repository dialog that appears, enter “ADT Plugin” for the Name and the following URL for the Location:
https://dl-ssl.google.com/android/eclipse/
Click OK. Note: If you have trouble acquiring the plugin, try using “http” in the Location URL, instead of “https” (https is preferred for security reasons).
In the Available Software dialog, select the checkbox next to Developer Tools and click Next. In the next window, you’ll see a list of the tools to be downloaded. Click Next. Read and accept the license agreements, then click Finish.Note: If you get a security warning saying that the authenticity or validity of the software can’t be established, click OK. When the installation completes, restart Eclipse.
Next in a terminal type
/opt/android-sdk-linux_x86/tools/android
This will bring up the AVD and SDK manager go to the available Packages in the side bar and select the API versions you wish. I usually select all of them to test against different revisions of the API. Proceed to install the selected packages which can take a long time depending on how many you have selected and you connection speed.
Step 5: Set up a virtual device
Once that’s completed we need to make a virtual device to develop our programs on.
In Eclipse go to Window>Android SDK and AVD Manager and select new , fill out the details as required and click create.
NOTE: it’s a good idea to make several AVD’s against the various API’s so you can thoroughly test your device.
You can now create a new android project by opening eclipse and selecting File>New>Other>Android>Android Project
(Optional )Step 6: Setting up a physical device
All credit for this section goes to unforgivin512
Source: http://unforgivendevelopment.com/2011/05/20/udev-headaches-on-debian-testing-wheezy/
On the android developers website the guide for setting up a device under Ubuntu says to create the file “/etc/udev/rules.d/51-android.rules” , this does not work in the case of Debian. What you have to do in this case is
nano /lib/udev/rules.d/91-permissions.rules as root
Find the text similar to this
# usbfs-like devices SUBSYSTEM==”usb”, ENV{DEVTYPE}==”usb_device”, \ MODE=”0664″
Then change the mode to 0666 like below
# usbfs-like devices SUBSYSTEM==”usb”, ENV{DEVTYPE}==”usb_device”, \ MODE=”0666”
This allows adb to work, however we still need to set up the device so it can be recognized. We need to create the file
nano /etc/udev/rules.d/99-android.rules as root
and enter
SUBSYSTEM==”usb”, ENV{DEVTYPE}==”usb_device”, ATTRS{idVendor}==”0bb4″, MODE=”0666″
NOTE: “0bb4” in this case is your vendors model (HTC in my case).
A full listing can be found here http://developer.android.com/guide/developing/device.html
Save the file and then restart udev as root /super user
/etc/init.d/udev restart as root
Connect the phone via USB and it should be detected when you compile and run a project.
That concludes this tutorial for today.


Bravo…. Best linux/android/eclipse set up tutorial out there.
Thank you D , glad it was of use to you
Pingback: Setting up Physical Android Device in Debian Squeeze | Akshay Dua
Thank you very much for the tutorial.. exactly what i needed for my debian install !!
No problem , Glad it helped
Pingback: Preparing Debian Squeeze for Android development « Moshe Njema
Great stuff man! 🙂
Thanks Monolith. Glad it was helpful
Thanks a lot for your tutorial, saved my day
awesome. thankyou.